27 October 2012

Tablet PC crochet case

A month ago we succumbed to common insanity about tablet PC's and bought one.
                            
The thing is, it didn't have a case included. And of course I immediately decided to make one.
Handmade crochet case may not be the most convenient and multi-purpose case available, but it also doesn't cost $100. And it is certainly the most fun.

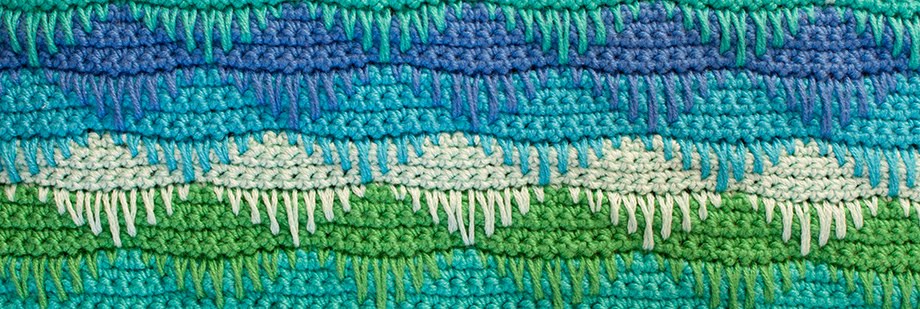
At first, I took out my summer cotton green-and-blue yarn. Then, I thought about a stitch I had been planning to use for a long time - Spike Stitch.
Crochet fabric made with this stitch is quite thick and firm - very appropriate for the purpose of tablet screen protection.
A couple of weeks later: that's what came out...


The case is in active use for a week now and feels all right :)

Now, here's a little spike stitch tutorial.

Start with a few rows of single crochet, using one color -  it's the base (or canvas) for a spike stitch. In my case, 5 rows.
Change color. Work  one usual sc into first st of new row.


Then, insert hook  one row below your working row:

And draw up a loop of the same height as the first loop on your hook:

Finish sc as usual: yarn over, pull through both loops - one spike stitch finished!

When you have mastered SP-1 (spike stitch into previous row) , try  SP-2, SP-3 and so on...
The difficult part is to find the right place to insert hook. But after a little practice it's no more a problem.
This is SP-5 (looking not very neat in the making!):


But quite OK when finished:

You can place spike stitches in specific geometric pattern, like I did, or in random order.
You can base them on sc or any other stitch (hdc, dc...).
Experiment with color combinations and don't forget to have fun :)

22 October 2012

Autumn colors: fingerless gloves


As the weather grew cooler and my hands started to freeze a little bit, I realized that my first ever crochet project is not quite so wearable. I decided to give the idea of fingerless mittens/gloves another try, after almost a year.
I finally used up remains of mustard yarn. Love this rich color, so appropriate for autumn.

These gloves are really easy to make, it's been only two evenings from start to finish.
(And then few weeks for photoshoot, getting pictures ready and writing the pattern. As usual!)


Pattern
 I used 50% wool 50% acrylic yarn with 4 mm hook.
Gauge: 16 sts x19 rows = 4 inches


Cuff: Start with ch 8. (Or more, if you want a wider cuff.)
Row 1: sc in  second ch from hook and in every remaining st of starting chain. Ch 1 turn.
Row 2: sc only in back loop of every st. Ch1 turn.
Repeat row 2 until the cuff fits your wrist. (I recommend to make it a little bit tight, because yarn tends to stretch and you don't want your gloves to be baggy.) Fold your cuff in half and join two sides with slip stitches. Then turn it inside out.

Main part: Now start working around the edge of the cuff.
Rows 1: ch 1. sc evenly distributed around, join with sl st. (Results in 27 sts in my case.)
Rows 2-7: ch1. Sc in every st around. Join with sl st.
(Number of rows before the finger hole can be changed depending on preferred length of the glove)
Row 8:
For the left glove: ch1. Sc in next 5 sts. ch 5 for finger hole, then sc in every sc around. Join with sl st.
For the right glove: ch1.  Sc in every st around till there is 10 stitches left to the end of row. Ch 5.  Sc in next 5 sts. Join with sl st.
Row 9: Repeat row 2.
Repeat row 9 until the glove reaches desired look. In my case, it's 10 rows after finger hole.
 
Finger: Hold the glove so that the cuff is pointing down and attach yarn to the right corner of the finger hole. Start first round on the lower side of finger slit and make sure that the right side of your crochet work is facing out and the wrong side in. Work about 7 rounds  of single crochet in spirals, without joining. Finish with slip stitch(es).
 An easy way to keep your hands warm. :)